Excel VBA Debugging Tools in Visual Basic Editor – Breakpoints & Break Mode, Stepping Through Code, Debugging Views
—————————————————————
Contents:
Debug Code by using a Message Box
Using Break Mode to Debug Code
Immediate Window
Locals Window
Watch Window
Call Stack
—————————————————————
Debugging is a very important aspect in VBA Programming. Developers need to identify and pinpoint mistakes while writing code and be able to make rectifications quickly. VBA provides numerous Debugging tools to troubleshoot problems at the development stage, and the ability to add error handling routines while writing macro code, and to provide quick fixes when users encounter errors during execution. In this section, we cover:
Debug Code by using a Message Box
Using a Message Box to check the changing values of a variable, is one of the most basic and often used methods while writing macro code. Use a message box immediately after the code line wherein the variable assumes a value, to check how the procedure runs with the dynamically changing variable values. Display a message box to get the value of a variable – MsgBox VariableName – after the code line which you want to validate, and then remove this after finishing writing the macro. Below examples show how to use MsgBox to test dynamic variable values as they change while the code is executed. Example 2 shows using the MsgBox being specifically useful for a Do Loop in determining the variance between when a condition is tested at the Start or at the End of the loop.
Example 1: Using MsgBox to test variable values for a Do…Until loop
Sub MsgBoxVariableValue()
‘using MsgBox to test variable values for a Do…Until loop
Dim i As Integer, iTotal As Integer
i = 0
Do
i = i + 1
‘returns 1, 2 & 3
MsgBox i
iTotal = iTotal + i
‘the code runs once more after testing the condition of i > 2 so as to reach the value of 3
Loop Until i > 2
‘returns 6
MsgBox iTotal
End Sub
Example 2: Using MsgBox to test dynamic variable values for a Do…Until loop
Condition is tested at the start of the loop, for a Do…Until Loop:
Sub DoUntil_TestStartOfLoop()
‘The condition (iTotal > 3) is tested at the start of the loop, for a Do…Until Loop
Dim i As Integer, iTotal As Integer
For i = 1 To 2
‘loop will run only for i = 1 because iTotal would have exceeded 3 by then & the condition (Until iTotal > 3) is tested before the Do loop starts
Do Until iTotal > 3
iTotal = iTotal + 2
‘returns 1 & 1
MsgBox “i = “ & i
‘returns 2 & 4
MsgBox “iTotal = ” & iTotal
Loop
Next i
‘returns 4
MsgBox “Final iTotal = “ & iTotal
End Sub
Condition is tested at the end of the loop, for a Do…Until Loop:
Sub DoUntil_TestEndOfLoop()
‘The condition (iTotal > 3) is tested at the end of the loop, for a Do…Until Loop
Dim i As Integer, iTotal As Integer
For i = 1 To 2
‘loop will also run for i = 2 even though iTotal would have exceeded 3 while i = 1, because the condition (Until iTotal > 3) is tested after the Do loop starts
Do
iTotal = iTotal + 2
‘returns 1, 1 & 2
MsgBox “i = “ & i
‘returns 2, 4 & 6
MsgBox “iTotal = “ & iTotal
Loop Until iTotal > 3
Next i
‘returns 6
MsgBox “Final iTotal = ” & iTotal
End Sub
There are several Debugging Tools in the Visual Basic Editor (VBE), as explained below.
You can place a Breakpoint, or multiple breakpoints, on any line in your code which temporarily stops or pauses your code execution at that point. At this point your macro is in break mode which allows you to view the current condition of the macro and to look at the current value of your variables by moving your cursor over them. On encountering a break point you can continue or reset and restart the macro. A break point can be placed on any line of your code which will be executed, but not on lines that define variables or in the General Declarations section. Breakpoints are usually set at a specific code line wherein you envisage an error, and then cleared as the errors are resolved. Note that you must set breakpoints for each debugging session as they do not get saved with your code.
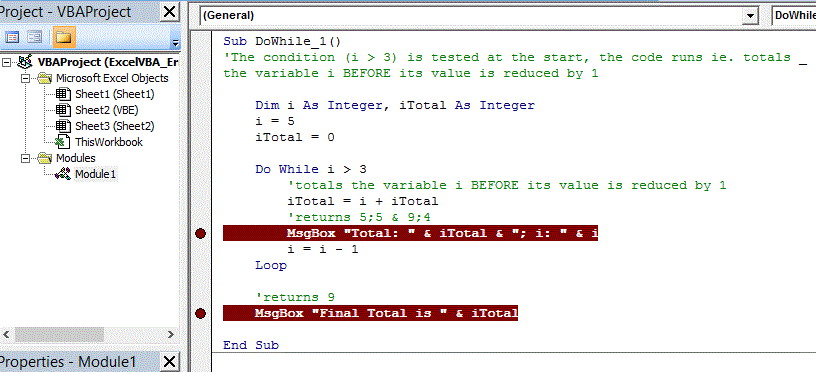
Add & Clear Breakpoints: To add a breakpoint, move to or click in the code line at which you want to place a breakpoint – Press F9 or on the Debug Menu click Toggle Breakpoint. A breakpoint is created for that line of code which will not be executed and at which point your macro will pause. Refer Image 1 which shows 2 breakpoints in a procedure. To clear a breakpoint, move to or click in the code line that contains the breakpoint – click with the mouse on the left border or Press F9 or on the Debug Menu click Toggle Breakpoint, all of which clear the breakpoint. To clear ALL breakpoints, either press Ctrl+Shift+F9 or on the Debug Menu click Clear All Breakpoints, in VBE.
Using Break Mode to Debug Code
Your macro is in Break Mode when code execution temporarily stops or pauses. You can enter Break Mode due to encountering a Breakpoint, or pressing Ctrl+Break during code execution, on encountering a Stop statement, on adding Break When Value is True watch expression or Break When Value Changes watch expression to the Watch Window, or without knowing on occurrence of a syntax error or run-time error. Break Mode allows you to view the current condition of the macro and to look at the current value of your variables by moving your cursor over them. Once in break mode, you can either choose to continue with code execution (F5), or step through the code (explained below) to trace the macro logic (F8, etc), or exit break mode by clicking Reset on the Run menu. On the occurrence of an error, you can either fix the error and choose to continue (F5, F8, etc) or else terminate code execution (Reset) and restart the macro. In break mode, you can also use the Immediate Window, Locals Window or the Watch window, to understand all the values – as explained below.
Click Step Into on the Debug Menu or press F8. At design time (within a procedure in VBE) this starts code execution from the beginning of the macro and enters break mode before executing the first line of code. This is one way to enter break mode and step through the code as this will run one line at a time and then go to the next one. If the line of code is a call to a procedure, the next line will be the first line in the called procedure. It is a very useful tool to trace the macro logic, stepwise. On encountering a Breakpoint while executing code, clicking Step Into enters break mode at the current line of execution.
Click Step Over on the Debug Menu or press Shift+F8. This is used for a line or statement that calls a procedure, to run that procedure without stepping though it. Step Over executes the called procedure as a whole, and then steps into the next line of the current procedure. This is generally used when you do not want to check the stepwise working of the called procedure presuming it to be error free. This option is available when you are in break mode only.
Click Step Out on the Debug Menu or press Ctrl+Shift+F8. Executes the remaining lines of the current procedure. This skips running one line at a time for the remainder of the current procedure, if you decide not to continue with Step Into. This option is available when you are in break mode only.
Click Set Next Statement on the Debug Menu or press Ctrl+F9. This lets you choose and set the line of code to be executed next, after the current line, by selecting the line of code you want to execute and choosing the Set Next Statement command. You can choose any line in the current procedure to be executed next, including lines already executed, and any intervening code will not be executed. This is particularly useful when you want to run some code within the current procedure and repeat it, or to skip over lines you do not want to execute. This option is available when you are in break mode only.
Click Show Next Statement on the Debug Menu. You might be checking out other procedures while debugging a macro, and using Show Next Statement will take you to the highlighted line which will be executed next. Click on Show Next Statement on the Debug Menu to place the cursor on the line that will execute next. This option is available when you are in break mode only.
Click Immediate Window on the View Menu or press Ctrl+G. The Immediate window is a primary debugging area, and it is used to: (i) display results of debug statements in your macro; (ii) you can type a vba statement or a line of code directly into the window and press Enter to execute it; and (iii) you can also change the value of a variable while running a macro – when your macro is in break mode and pauses, you can assign a new value to the variable (in the Immediate window) as you would in the macro itself. In the Immediate window you can evaluate vba statements or expressions which may be related to your macro or unrelated, and whether your macro is running or not.
When your macro is in break mode, a vba statement in the Immediate Window is executed in the context of that macro – ex. if you type MsgBox i (where i is a variable name being used in the macro) in the Immediate window, you will get the current macro value of the variable i as if this command (MsgBox i) was being executed within the macro. You can now change this current variable value (of i) by assigning a new value to it in the Immediate window, and then continue or test your code with the new assigned value. You will also often type vba commands directly in the Immediate window, to evaluate them.
To return a value, precede the expression with a question mark, ex. ? 5/2, and omit the question mark to run a code which does not return a value.
Refer Image 2, which shows the macro testCode in the Code window and how vba statements are evaluated in the Immediate window – a Break Point is placed on the line MsgBox “n = ” & n and the macro pauses at this point (macro is in Break Mode) before displaying the message box.

| ?5/2 2.5 |
The vba expression of 5/2 is preceded with a ? because it returns a value, and is independent of the macro, and pressing Enter will output 2.5 in the next line. |
| msgbox 7/2 | The vba expression of msgbox 7/2 is independent of the macro, and pressing Enter on the line will return 3.5 in the message box. |
| msgbox “Hello” | This vba expression is independent of the macro, and pressing Enter on the line will return “Hello” in the message box. |
| call testCode | Pressing Enter on the line will call and run the macro testCode. |
| ?n 5 |
The macro is in break mode on encountering a Break Point, and at this stage pressing enter to evaluate the variable (n preceded by ?) will output the current macro variable value of 5 in the next line. |
| msgbox n | Pressing Enter on the line will display the current variable value of 5 in the message box. Running your cursor over the variable n, will display its value as a tool tip (refer Image 2). |
| n=n-1 | Press Enter on this line to change the current variable value. |
| ?n 4 |
Pressing enter on the line of ?n will output the changed macro variable value of 4, in the next line. After this, you can continue executing the macro in the Code window with the changed value of the variable n, of 4. |
Locals Window
In the Immediate Window, you can evaluate variable values by individually typing each variable name, but using the Locals window will display all declared variables in the current procedure and their Type and current values. The current variable value of a local variable can be modified in the Locals window by clicking on the Value column, as against changing variable values in the Immediate Window. The Locals window will display for local variables declared in the current procedure and variables declared in the modules declaration section – the diplay is in 3 columns: Expression, Value & Type. Note that Locals Window is used only when your macro is in Break Mode.
Refer Images 3a to 3f which display the macro in the Code window and the Locals window below – we explain this step by step by stepping through the code by pressing F8:
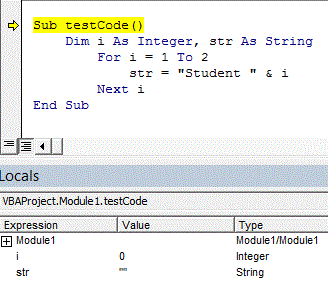
Image 3a: The first press of F8 in the macro displays the heading of VBAProject with the Module and macro name, and the 3 columns of Expression, Value & Type displaying the variable names, their initial default values and Type.
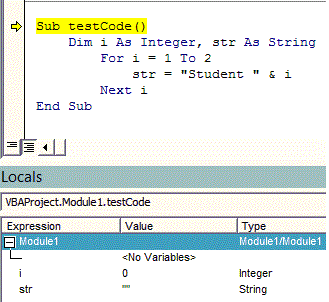
Image 3b: Clicking on the + sign expands the tree view.
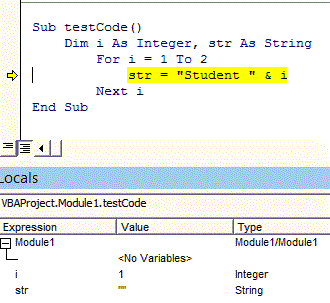
Image 3c: After executing the first line (For i = 1 to 2) of the loop, the current value of the variable i is 1.
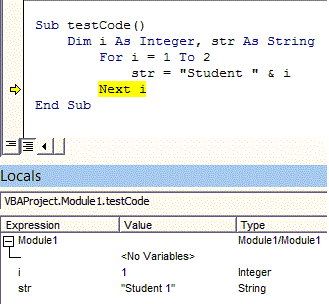
Image 3d: After executing the next line (str = “Student ” & i) of the loop, the current value of the variable str is “Student 1”.

Image 3e: After executing the first line (For i = 1 to 2) of the loop again, the current value of the variable i is 2. At this point, we click on the Value column and change the value of variable i from 1 to 5.

Image 3f: After changing the value of i to 5 in the above step, we execute the next line (str = “Student ” & i) of the loop, and the current value of the variable str is “Student 5” (current value of variable i is displayed as 5).
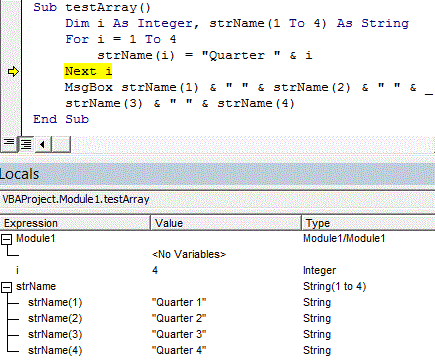
Refer Image 4 which displays the macro in the Code window and the Locals window below which expands the tree view for an array variable and displays current value of each array element, after executing the For…Next loop.
Watch Window
Watch Window is similar to the Locals Window as in allowing you to track values of variables in break mode. The Locals Window automatically tracks all declared variables in the current procedure, whereas in the Watch Window you will need to specify the variables which you want to track. In the Watch Window, irrespective of the current line, you can track variable values across modules and procedures. You can manually add variables and even expressions to the Watch Window, when in Break Mode.
To add a variable to the Watch Window, either right-click the variable and select Add Watch from the right-click menu, or place cursor on the variable and select Add Watch from the Debug menu, and in both these cases a dialog box (Refer Image 5a) appears wherein the Expression field will display the variable name. In the Context Section, the current procedure and module are added. Pressing Ok will add the variable to the Watch Window. To add a variable to the Watch Window, you can also click Add Watch on the Debug Menu, and in the dialog box that appears manually type the variable name or expression in the Expression field. In the Watch Type Section, select the relevant option between Watch Expression, Break When Value is True, or Break When Value Changes. You will now be able to track the variable’s value in the Watch Window. If you have selected the Break When Value Changes option your macro will go into Break Mode each time the variable value changes, and selecting the Break When Value is True option will make your macro go into Break Mode when the value of the watch expression changes and evaluates to True. To edit or delete the Watch, select the relevant variable in the Watch Window, right-click and select Edit Watch or Delete Watch, or alternatively select Edit Watch from the Debug Menu.
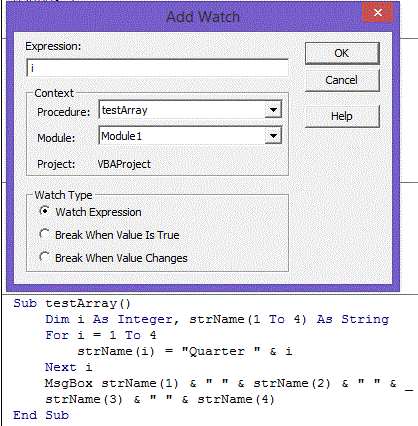
Refer Image 5a which displays the macro in the Code window and the Add Watch dialog box above, while adding a Watch.

Refer Image 5b which displays the macro in the Code window and the Watch Window below, in break mode after executing the first For…Next loop.
Click Call Stack on the View Menu or press Ctrl+L.
In break mode, this displays the Call Stack dialog box, which lists the currently active procedure calls. While executing code in a procedure, that procedure is added to the list of active procedure calls. If that procedure calls another procedure, the called procedure is also added to the list which will then contains two procedures. As the execution returns to the calling procedure, the called procedure is removed from the list. Procedures that are called from the Immediate window are also added to the list. In the dialog box, you can double click on any procedure or select any procedure and click on Show to keep track how you got there. Refer Image 6 to view Call Stack dialog box.

